Saving and Exporting our Project (VERY IMPORTANT)
Saving and Exporting Our Project
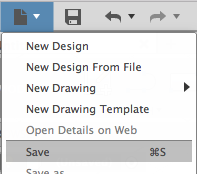
Once you are done with your keychain, you will need to save it to make sure that you don’t lose it, and export it as an STL file to be printed. To do this, in the top left corner, open the “File” menu that we talked about earlier. Below is the icon if you forgot. In that menu select “Save.”

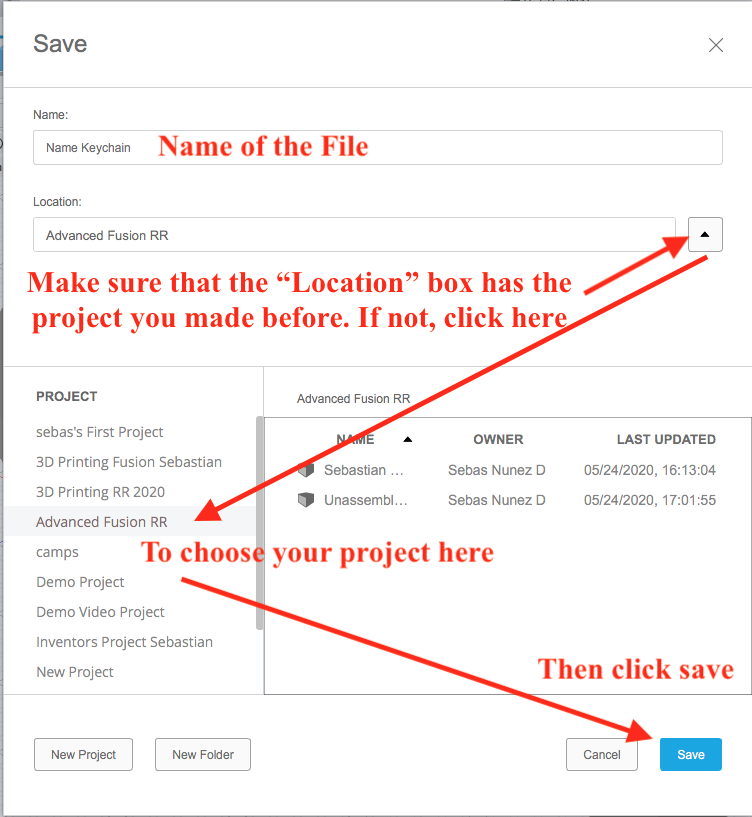
Now, students should type “their name” and “keychain” (EX: Sebastian Keychain) where the “Name:” box is on the window that opened when you hit save. Also, make sure that the students save to the right project. Verify this by left clicking on the drop down arrow next to the “Location:” box to the right and then choose their project below by scrolling and then left clicking on the name of the student’s project to select. Don’t forget to left click on “SAVE”.
Now we are ready to create an STL file of our keychain. An STL file is basically the PDF of 3D models, any program or computer that has some sort of 3D environment can open an STL, and your computer can also open it as long as your computer can read PDFs!
Open the file menu like before, but this time, left click on the “3D Print” option. You will get a menu to the right side of the view window. Now, the “Preview Mesh” checkbox should have a checkmark on it so that kids can tell if they have selected their part correctly. If this does not have a checkmark make sure to left click on the box to checkmark it. Then make sure “Refinement” is set to “High” to obtain a better print quality. If this isn’t set to “High” left click on the refinement drop down to select “High”. “Send to 3D Print Utility” should NOT have a checkmark on it. After all of this is done, left click on your keychain to select it and you will see a blue picture of the keychain’s Mesh, which is basically a model of your keychain made entirely of polygons, specifically triangles. Then click OK.
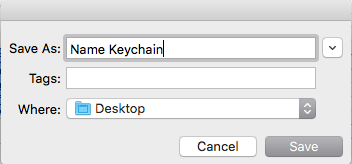
Then, you will get a popup window. Students should write “their name” and “keychain” (EX: Sebastian Keychain) where the “Save As:” box is on the popup window, just like they did when saving their keychain. Make sure that their location is set to “Desktop” and then left click “Save” and we’re done!
Very Important:
After you have successfully exported the STL file of your project, the next step will be to email this file to Rolling Robots. This is an especially important step for remote students who wish to have their projects printed and delivered.
Because many students do not have an email account, this step is mainly for the parents/guardians to follow. Students may send their projects through their own email account with their parents'/guardians' permission. The email address used to send projects is info@rollingrobots.com
After sending your projects through, it may take the projects approximately one to two weeks to be ready to be delivered, however, please feel free to contact the Palos Verdes Rolling Robots location in case you have any questions or concerns.