Reversing Drive Code
Driving a Robot with 2 Fronts
We may build robots that have one end effector on one side and a different end effector on the other side. For Tipping Point 2021 - 2022 season an example may be a robot that has a ring intake on one side and a mobile goal lift on the other. In this case which is the front of the robot and which way is drive forward? Do we make a choice and pick one side as front and the forward drive direction? Or can we come up with a way to change it at will and sometimes drive the robot with one side forward and at another time use the other side as forward.
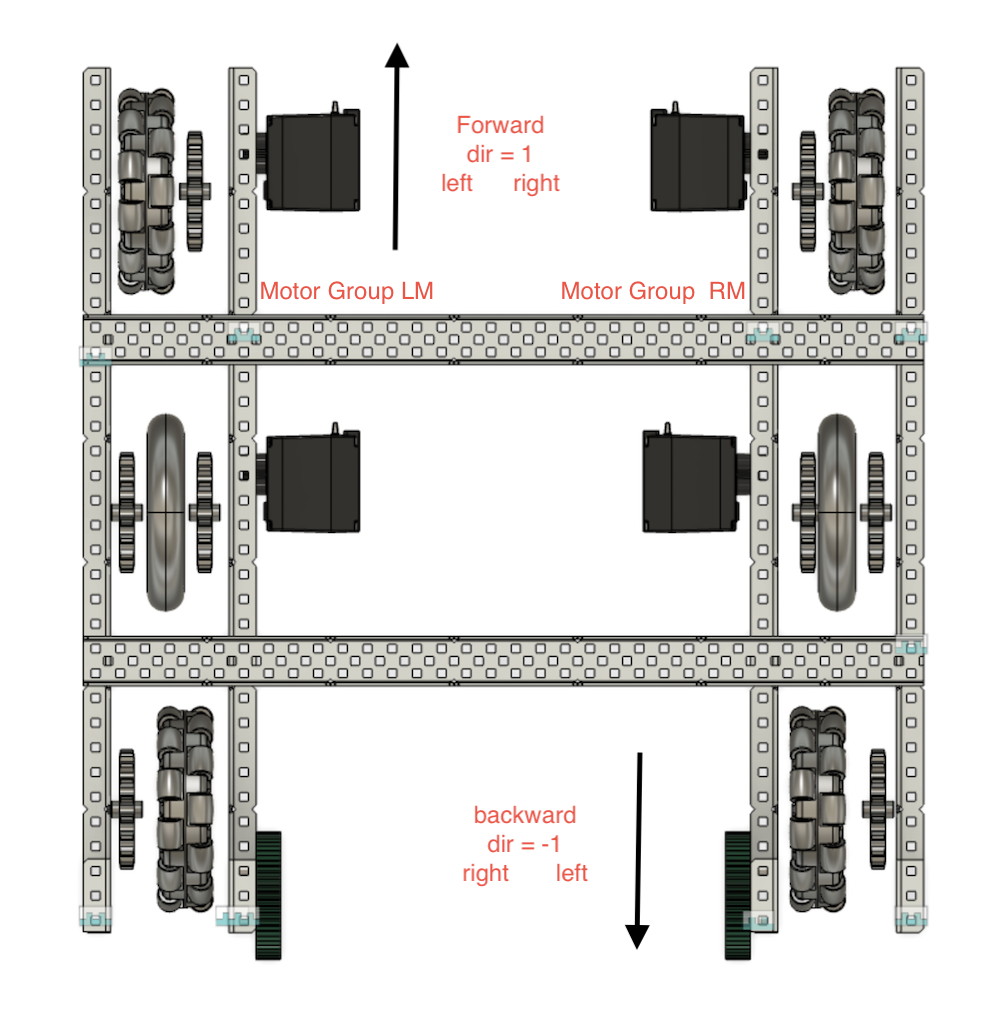
A 4 motor drive base. The default is the top if the front. So we have forward towards the top and Left motor group, LM on left side and right motor group, RM on right side.
Drive Function
The usual tank drive function is presented here using motor groups and voltage control. The Motor groups LM and RM consist of 2 motors each that will both run at the same speed and direction. We use voltage control that will apply a specific voltage to the motor. The voltage range is between -12000 mV and + 12000 mV. The joystick values are between -100 and +100 percent. This is why the stick value is multiplied by 120 to get the desired voltage value.
void driveVolts(int lspeed, int rspeed, int wt)
{
  LM.spin(forward, lspeed*120, voltageUnits::mV);
  RM.spin(forward, rspeed*120, voltageUnits::mV);
  wait(wt, msec);
}
Reversing the Drive
To reverse the robot we have to take into account two things:
- Turn motors at a negative speed
- Swap right and left sides
to spin at a negative value we can just have a variable for direction that we set to 1 for forward or -1 for backward, then multiply the stick value by this.
lstick=dir*Controller1.Axis3.position();
rstick=dir*Controller1.Axis2.position();
to swap right and left we can use if else logic. if dir ==1 then just call the drive function. Else call the drive function with left and right swapped. We dont need to use else if since dir can only be 1 or -1.
if(dir==1){
      driveVolts(lstick, rstick, 10);
    }
    else{
    driveVolts(rstick, lstick, 10);
     }
The only thing remaining is to make a button or buttons to set the value of dir. Below is one implementation
 if(Controller1.ButtonUp.pressing())
    {
      dir=1;
      Brain.Screen.printAt(1, 40, "I am driving Forward  >>");
      }
       if(Controller1.ButtonDown.pressing())
    {
      dir=-1;
      Brain.Screen.printAt(1, 40, "I am driving Backward <<");
      }
In this implementation it is helpful to print to the brain screen which way we are going. You may want to find a way to signal the driver which way it is going, possibly something on the screen that could be read from a distance.
Example Code
Example code is posted on the Rolling Robots Examples gitHub. Most of it is strung together here as text:
void driveVolts(int lspeed, int rspeed, int wt)
{
  LM.spin(forward, lspeed*120, voltageUnits::mV);
  RM.spin(forward, rspeed*120, voltageUnits::mV);
  wait(wt, msec);
}

void driver() {
  int dir=1; //1 = forward, -1 =backward
  int lstick=0;
  int rstick=0;
  while (true) {
    if(Controller1.ButtonUp.pressing())
    {
      dir=1;
      Brain.Screen.printAt(1, 40, "I am driving Forward  >>");
      }
       if(Controller1.ButtonDown.pressing())
    {
      dir=-1;
      Brain.Screen.printAt(1, 40, "I am driving Backward <<");
      }
    lstick=dir*Controller1.Axis3.position();
    rstick=dir*Controller1.Axis2.position();
    if(dir==1){
      driveVolts(lstick, rstick, 10);
    }
    else{
    driveVolts(rstick, lstick, 10);
     }
  }
}